> ## Documentation Index
> Fetch the complete documentation index at: https://docs.cedarcopilot.com/llms.txt
> Use this file to discover all available pages before exploring further.
# Creating custom agent flows
> Learn how Cedar makes appropriate calls to your agent
Cedar provides a flexible system for creating custom agent flows that can work with different backend providers. This guide explains how Cedar prepares requests, routes calls, and handles responses from your agent backend.
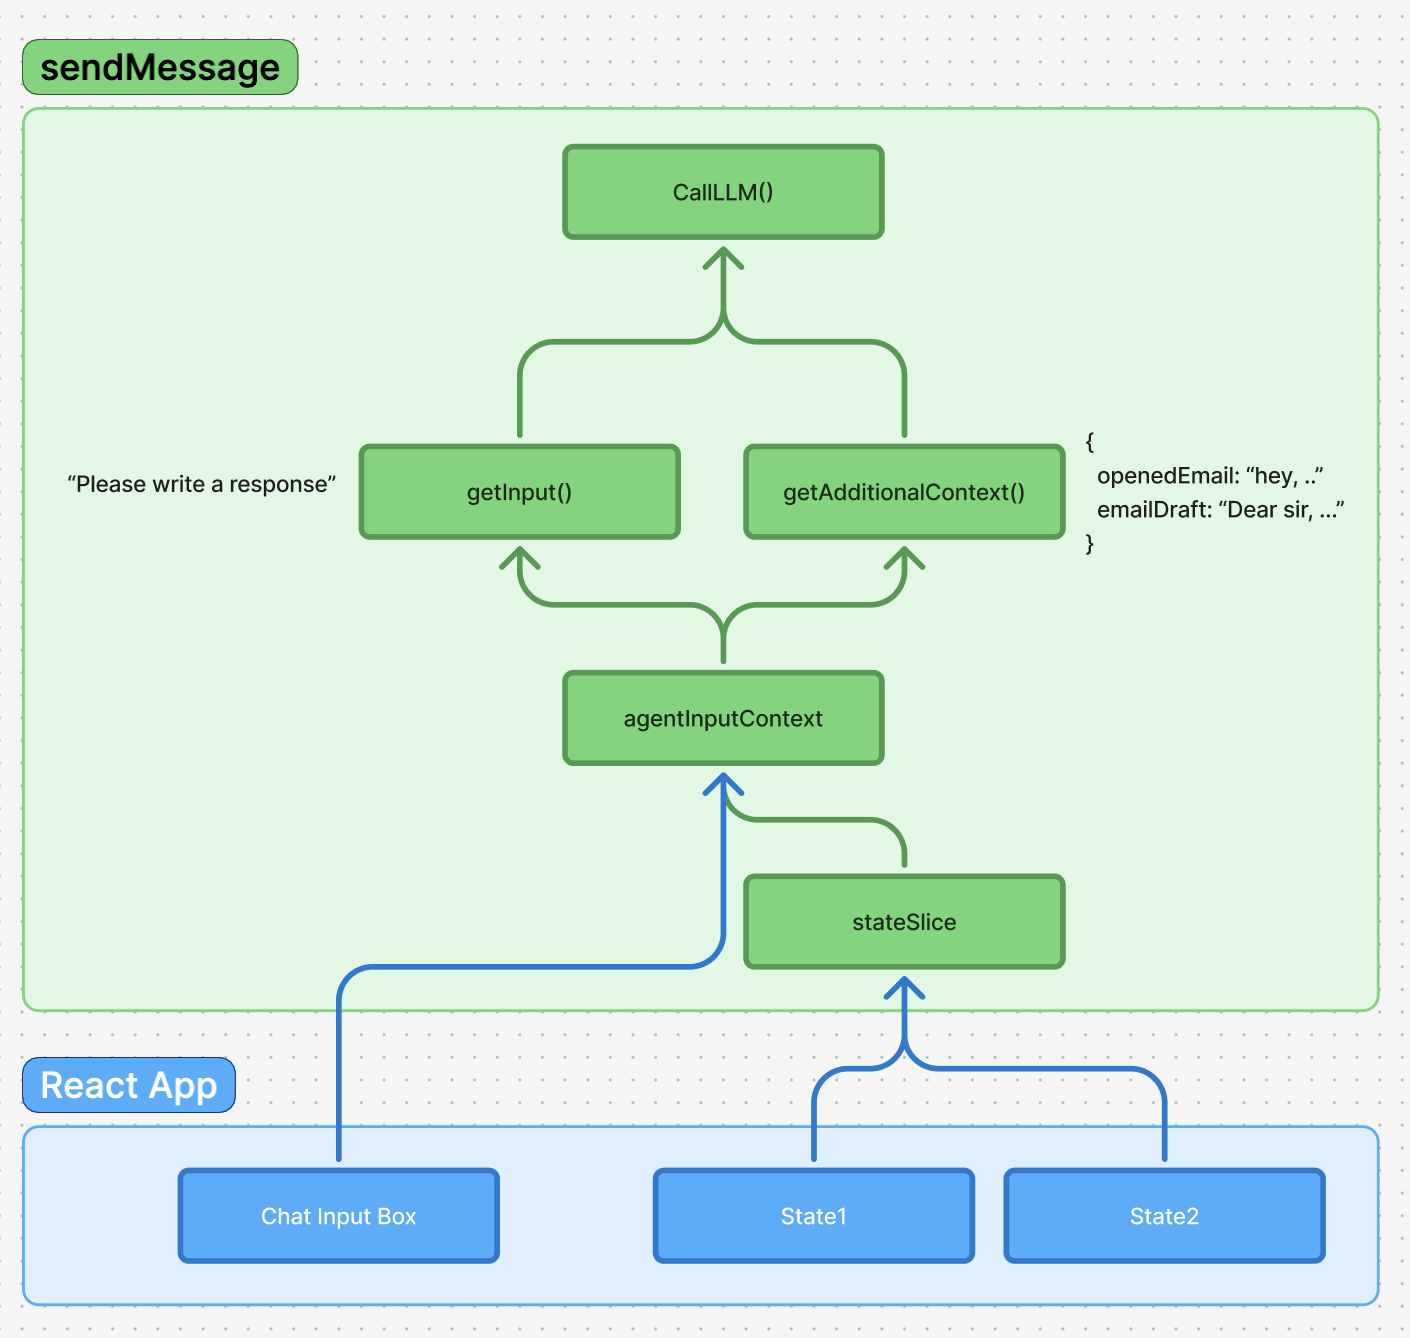 ### Preparing the Request Body
Before making any call to your agent backend, Cedar automatically assembles all the necessary context and data. This preparation process ensures your agent receives comprehensive information to generate meaningful responses.
Cedar extracts the current user input from the chat editor, converting the rich text content into a clean string format.
```tsx theme={null}
// Cedar automatically calls stringifyEditor() to extract text
const editorContent = state.stringifyEditor();
// Result: "What's the status of the user authentication feature?"
```
Cedar collects all subscribed state and additional context that has been registered with the agent input system.
```tsx theme={null}
// Cedar automatically gathers additional context
const additionalContext = state.compileAdditionalContext();
// Result includes: subscribed state, custom setters, mention data, etc.
```
The `agentContextSlice` manages all context gathering. See [Agent Input Context](/agent-context/agent-context) for details on how to subscribe state and provide context to your agents.
Cedar serializes the collected context into a structured format that your agent backend can parse and understand.
```tsx theme={null}
// Example of tokenized additional context
{
"todos": [
{ "id": "1", "title": "Fix login bug", "completed": false }
],
"setters": {
"addTodo": {
"name": "addTodo",
"stateKey": "todos",
"description": "Add a new todo item",
"schema": {
"type": "object",
"properties": {
"title": {
"type": "string",
"description": "The title of the todo item"
}
},
"required": ["title"]
}
}
}
}
```
The network request body varies significantly between providers, allowing Cedar to work with different backend architectures while maintaining a consistent internal API.
For mastra and Custom backends, we pass in additionalContext, state, and more as seperate fields to give you control over what you want to do with the context and state.
For direct LLM calls, we automatically tokenise the additionalContext & prompt into one string for optimal responses.
### Request Body Differences
```json Mastra Format theme={null}
{
"prompt": "What's the status of the user authentication feature?",
"systemPrompt": "You are a helpful project manager...",
"additionalContext": {
"todos": [...],
"setters": {...}
},
"states": {
"emails:": [...]
},
"route": "/chat",
"resourceId": "user123",
"threadId": "thread456",
}
```
```json OpenAI Format theme={null}
{
"model": "gpt-4o-mini",
"messages": [
{
"role": "system",
"content": "You are a helpful project manager..."
},
{
"role": "user",
"content": "
User Text: What's the status of the user authentication feature?
Additional Context: {
todos: [
{ id: 1, title: Fix login bug, completed: false }
],
setters: {
addTodo: {
name: addTodo,
stateKey: todos,
description: Add a new todo item,
parameters: [title: string]
}
}
}"
}
],
}
```
```json Custom Format theme={null}
{
"prompt": "What's the status of the user authentication feature?",
"additionalContext": {
"todos": [...],
"setters": {...}
},
"states": {
"emails:": [...]
},
}
```
## Creating Your Own AI Workflow
Beyond using Cedar's built-in agent connections, you can create custom AI workflows that leverage Cedar's context system while implementing your own processing logic.
Create a function that defines a specific prompt for your workflow. This allows you to customize the AI's behavior for your specific use case.
```tsx theme={null}
function createSummaryWorkflow() {
const systemPrompt = `You are a project summary assistant.
Analyze the provided todos and create a concise project status report.
Focus on completion rates and upcoming priorities.`;
return systemPrompt;
}
```
Use Cedar's context system to get exactly the data your workflow needs. You can filter and transform the context to match your requirements.
```tsx theme={null}
function getProjectContext(state: CedarState) {
const additionalContext = state.compileAdditionalContext();
// Extract only the data relevant to project summaries
const projectContext = {
todos: additionalContext.todos || [],
deadlines: additionalContext.deadlines || [],
teamMembers: additionalContext.teamMembers || [],
};
return projectContext;
}
```
Make the API call to your chosen LLM provider with your custom prompt and filtered context.
```tsx theme={null}
async function callLLM(prompt: string, context: any) {
const response = await fetch('https://api.openai.com/v1/chat/completions', {
method: 'POST',
headers: {
Authorization: `Bearer ${process.env.OPENAI_API_KEY}`,
'Content-Type': 'application/json',
},
body: JSON.stringify({
model: 'gpt-4o-mini',
messages: [
{
role: 'system',
content: createSummaryWorkflow(),
},
{
role: 'user',
content: `Project Context: ${JSON.stringify(
context,
null,
2
)}\n\nGenerate a project summary.`,
},
],
}),
});
return response;
}
```
Process the raw LLM response using Cedar's response handling system to ensure proper integration with your application.
```tsx theme={null}
async function handleLLMResponse(response: Response, state: CedarState) {
const data = await response.json();
const content = data.choices[0]?.message?.content;
// Use Cedar's response processor
const processor = state.agentConnection.responseProcessors.get('message');
if (processor && content) {
await processor(content, state);
}
return content;
}
```
Add your own parsing logic to extract structured data from the LLM response and return it in the format your application needs.
```tsx theme={null}
function parseProjectSummary(llmResponse: string) {
// Extract structured data from the response
const summaryMatch = llmResponse.match(/Summary: (.*?)(?:\n|$)/);
const prioritiesMatch = llmResponse.match(/Priorities: (.*?)(?:\n|$)/);
const completionMatch = llmResponse.match(/Completion: (\d+)%/);
return {
summary: summaryMatch?.[1] || '',
priorities: prioritiesMatch?.[1]?.split(',').map((p) => p.trim()) || [],
completionRate: completionMatch?.[1] ? parseInt(completionMatch[1]) : 0,
generatedAt: new Date().toISOString(),
};
}
// Complete workflow function
export async function runProjectSummaryWorkflow(state: CedarState) {
try {
const context = getProjectContext(state);
const response = await callLLM(createSummaryWorkflow(), context);
const llmContent = await handleLLMResponse(response, state);
const structuredResult = parseProjectSummary(llmContent);
return structuredResult;
} catch (error) {
console.error('Project summary workflow failed:', error);
throw error;
}
}
```
## Typed Backend Integration
Cedar-OS now supports fully typed backend integrations with generic sendMessage parameters. You can specify custom field types and additional context types for enhanced type safety:
```tsx theme={null}
// Define your custom types
type CustomFields = {
userId: string;
sessionId: string;
priority?: 'low' | 'medium' | 'high';
};
type UserContext = {
userPreferences: Record;
};
// Use sendMessage with full type safety
await sendMessage({
route: '/chat',
temperature: 0.7,
additionalContext: { userPreferences: { theme: 'dark' } },
userId: 'user123', // ✅ Fully typed
sessionId: 'session456', // ✅ Fully typed
priority: 'high', // ✅ Fully typed
});
```
This provides both compile-time type checking and runtime validation when used with the corresponding Zod schemas.
For more advanced response processing patterns and custom response handlers,
see [Custom Response
Processing](/agent-backend-connection/custom-response-processing) to learn how
to create sophisticated response processors that can handle streaming,
actions, and complex data transformations.
### Preparing the Request Body
Before making any call to your agent backend, Cedar automatically assembles all the necessary context and data. This preparation process ensures your agent receives comprehensive information to generate meaningful responses.
Cedar extracts the current user input from the chat editor, converting the rich text content into a clean string format.
```tsx theme={null}
// Cedar automatically calls stringifyEditor() to extract text
const editorContent = state.stringifyEditor();
// Result: "What's the status of the user authentication feature?"
```
Cedar collects all subscribed state and additional context that has been registered with the agent input system.
```tsx theme={null}
// Cedar automatically gathers additional context
const additionalContext = state.compileAdditionalContext();
// Result includes: subscribed state, custom setters, mention data, etc.
```
The `agentContextSlice` manages all context gathering. See [Agent Input Context](/agent-context/agent-context) for details on how to subscribe state and provide context to your agents.
Cedar serializes the collected context into a structured format that your agent backend can parse and understand.
```tsx theme={null}
// Example of tokenized additional context
{
"todos": [
{ "id": "1", "title": "Fix login bug", "completed": false }
],
"setters": {
"addTodo": {
"name": "addTodo",
"stateKey": "todos",
"description": "Add a new todo item",
"schema": {
"type": "object",
"properties": {
"title": {
"type": "string",
"description": "The title of the todo item"
}
},
"required": ["title"]
}
}
}
}
```
The network request body varies significantly between providers, allowing Cedar to work with different backend architectures while maintaining a consistent internal API.
For mastra and Custom backends, we pass in additionalContext, state, and more as seperate fields to give you control over what you want to do with the context and state.
For direct LLM calls, we automatically tokenise the additionalContext & prompt into one string for optimal responses.
### Request Body Differences
```json Mastra Format theme={null}
{
"prompt": "What's the status of the user authentication feature?",
"systemPrompt": "You are a helpful project manager...",
"additionalContext": {
"todos": [...],
"setters": {...}
},
"states": {
"emails:": [...]
},
"route": "/chat",
"resourceId": "user123",
"threadId": "thread456",
}
```
```json OpenAI Format theme={null}
{
"model": "gpt-4o-mini",
"messages": [
{
"role": "system",
"content": "You are a helpful project manager..."
},
{
"role": "user",
"content": "
User Text: What's the status of the user authentication feature?
Additional Context: {
todos: [
{ id: 1, title: Fix login bug, completed: false }
],
setters: {
addTodo: {
name: addTodo,
stateKey: todos,
description: Add a new todo item,
parameters: [title: string]
}
}
}"
}
],
}
```
```json Custom Format theme={null}
{
"prompt": "What's the status of the user authentication feature?",
"additionalContext": {
"todos": [...],
"setters": {...}
},
"states": {
"emails:": [...]
},
}
```
## Creating Your Own AI Workflow
Beyond using Cedar's built-in agent connections, you can create custom AI workflows that leverage Cedar's context system while implementing your own processing logic.
Create a function that defines a specific prompt for your workflow. This allows you to customize the AI's behavior for your specific use case.
```tsx theme={null}
function createSummaryWorkflow() {
const systemPrompt = `You are a project summary assistant.
Analyze the provided todos and create a concise project status report.
Focus on completion rates and upcoming priorities.`;
return systemPrompt;
}
```
Use Cedar's context system to get exactly the data your workflow needs. You can filter and transform the context to match your requirements.
```tsx theme={null}
function getProjectContext(state: CedarState) {
const additionalContext = state.compileAdditionalContext();
// Extract only the data relevant to project summaries
const projectContext = {
todos: additionalContext.todos || [],
deadlines: additionalContext.deadlines || [],
teamMembers: additionalContext.teamMembers || [],
};
return projectContext;
}
```
Make the API call to your chosen LLM provider with your custom prompt and filtered context.
```tsx theme={null}
async function callLLM(prompt: string, context: any) {
const response = await fetch('https://api.openai.com/v1/chat/completions', {
method: 'POST',
headers: {
Authorization: `Bearer ${process.env.OPENAI_API_KEY}`,
'Content-Type': 'application/json',
},
body: JSON.stringify({
model: 'gpt-4o-mini',
messages: [
{
role: 'system',
content: createSummaryWorkflow(),
},
{
role: 'user',
content: `Project Context: ${JSON.stringify(
context,
null,
2
)}\n\nGenerate a project summary.`,
},
],
}),
});
return response;
}
```
Process the raw LLM response using Cedar's response handling system to ensure proper integration with your application.
```tsx theme={null}
async function handleLLMResponse(response: Response, state: CedarState) {
const data = await response.json();
const content = data.choices[0]?.message?.content;
// Use Cedar's response processor
const processor = state.agentConnection.responseProcessors.get('message');
if (processor && content) {
await processor(content, state);
}
return content;
}
```
Add your own parsing logic to extract structured data from the LLM response and return it in the format your application needs.
```tsx theme={null}
function parseProjectSummary(llmResponse: string) {
// Extract structured data from the response
const summaryMatch = llmResponse.match(/Summary: (.*?)(?:\n|$)/);
const prioritiesMatch = llmResponse.match(/Priorities: (.*?)(?:\n|$)/);
const completionMatch = llmResponse.match(/Completion: (\d+)%/);
return {
summary: summaryMatch?.[1] || '',
priorities: prioritiesMatch?.[1]?.split(',').map((p) => p.trim()) || [],
completionRate: completionMatch?.[1] ? parseInt(completionMatch[1]) : 0,
generatedAt: new Date().toISOString(),
};
}
// Complete workflow function
export async function runProjectSummaryWorkflow(state: CedarState) {
try {
const context = getProjectContext(state);
const response = await callLLM(createSummaryWorkflow(), context);
const llmContent = await handleLLMResponse(response, state);
const structuredResult = parseProjectSummary(llmContent);
return structuredResult;
} catch (error) {
console.error('Project summary workflow failed:', error);
throw error;
}
}
```
## Typed Backend Integration
Cedar-OS now supports fully typed backend integrations with generic sendMessage parameters. You can specify custom field types and additional context types for enhanced type safety:
```tsx theme={null}
// Define your custom types
type CustomFields = {
userId: string;
sessionId: string;
priority?: 'low' | 'medium' | 'high';
};
type UserContext = {
userPreferences: Record;
};
// Use sendMessage with full type safety
await sendMessage({
route: '/chat',
temperature: 0.7,
additionalContext: { userPreferences: { theme: 'dark' } },
userId: 'user123', // ✅ Fully typed
sessionId: 'session456', // ✅ Fully typed
priority: 'high', // ✅ Fully typed
});
```
This provides both compile-time type checking and runtime validation when used with the corresponding Zod schemas.
For more advanced response processing patterns and custom response handlers,
see [Custom Response
Processing](/agent-backend-connection/custom-response-processing) to learn how
to create sophisticated response processors that can handle streaming,
actions, and complex data transformations.